Grafting Trees for Bonsai: The Art of Combining Different Species

The Art of Combining Different Species

Grafting is the ancient art of joining two or more plants together to create a single, new plant. The technique has been used for centuries to create new varieties of fruits, vegetables, and flowers, and it can also be used to create beautiful and unique bonsai trees. While grafting a bonsai tree can be a rewarding experience, it is also important to keep in mind the intensive care and maintenance that is required to ensure the grafts successfully establish.

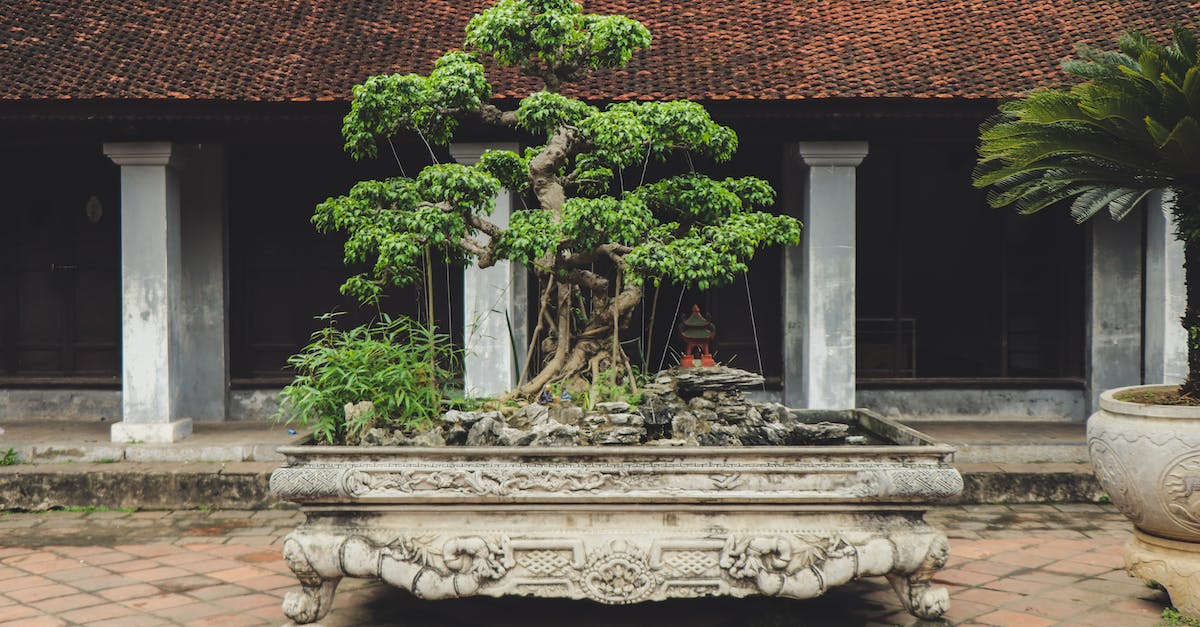
Bonsai trees are miniature trees that are grown in containers. They are often created by grafting different species of trees together, and this can result in some very unusual and beautiful specimens combining the features of the two components. Bonsai trees require a great deal of care and maintenance, but they can also be a great source of pride and joy. Whether you are a novice gardener or an experienced horticulturalist, grafting a bonsai tree is a rewarding and enjoyable experience.

This article will provide you with all the information you need to know about grafting trees for bonsai, including the different types of grafts, how to choose the right rootstock and scion, and how to perform and care for the graft. By following the instructions in this article, you can create your own beautiful and unique bonsai tree and impress your friends and family.

1. What is Grafting?

Grafting is a horticultural technique that involves joining two or more plants together so that they grow as one. The technique has been used for centuries to create new varieties of fruits, vegetables, and flowers, and it can also be used to create beautiful and unique bonsai trees.

When grafting bonsai trees, the goal is to combine different species of trees, each with its own unique characteristics. This can result in some very unusual and beautiful specimens. For example, a maple tree can be grafted onto a pine tree, creating a tree with the leaves of a maple tree and the trunk and branches of a pine tree. Or, a cherry tree can be grafted onto a plum tree, creating a tree with the flowers of a cherry tree and the fruit of a plum tree.

Grafting can also be used to improve the vigor or health of a tree. For example, a weak or diseased tree can be grafted onto a stronger, healthier tree, giving the weaker tree a new lease on life. Or, a tree that is not well-suited to a particular climate can be grafted onto a tree that is better adapted to the climate, allowing the tree to thrive in its new environment.

Why Graft Trees for Bonsai?

Why Graft Trees for Bonsai?

There are many reasons why you might want to graft trees for bonsai. Perhaps you want to create a unique tree that doesn’t exist in nature, or maybe you want to improve the vigor or health of a tree. Whatever your reasons, grafting can be a rewarding and enjoyable experience.

One of the most common reasons to graft trees for bonsai is to create a unique tree that doesn’t exist in nature. By combining different species of trees, you can create trees with unique combinations of characteristics. For example, you could create a tree with the leaves of a maple tree and the trunk and branches of a pine tree. Or, you could create a tree with the flowers of a cherry tree and the fruit of a plum tree.

Another reason to graft trees for bonsai is to improve the vigor or health of a tree. For example, a weak or diseased tree can be grafted onto a stronger, healthier tree, giving the weaker tree a new lease on life. Or, a tree that is not well-suited to a particular climate can be grafted onto a tree that is better adapted to the climate, allowing the tree to thrive in its new environment.

Types of Grafts

Types of Grafts

There are many different types of grafts that can be used for bonsai. The most common type of graft is the cleft graft, which is used to join two branches together. Other types of grafts include the whip and tongue graft, the saddle graft, and the veneer graft.

Cleft Graft: The cleft graft is the most common type of graft used for bonsai. It is used to join two branches together, and it is relatively easy to perform. To perform a cleft graft, you will need to make a V-shaped cut in the rootstock and a matching V-shaped cut in the scion. The two cuts should be the same size, and the cambium layers of the two trees should be aligned. Once the cuts are made, the scion is inserted into the cleft in the rootstock, and the graft is secured with grafting tape or wax.

Whip and Tongue Graft: The whip and tongue graft is another common type of graft used for bonsai. It is used to join two branches that are of similar size. To perform a whip and tongue graft, you will need to make a long,斜めcut on both the rootstock and the scion. The cuts should be about 1 inch long, and they should be made at a 45-degree angle. Once the cuts are made, you will need to make a small tongue in the center of each cut. The tongues should be about 1/2 inch long. The two tongues are then interlocked, and the graft is secured with grafting tape or wax.

2. Choosing the Right Rootstock and Scion

Choosing the Right Rootstock and Scion

The first step to grafting trees for bonsai is to choose the right rootstock and scion. The rootstock is the tree that will be providing the roots and trunk for the new tree. The scion is the tree that will be providing the branches and leaves.

Rootstock: When choosing a rootstock, there are a few factors to consider. The first is the size of the tree. The rootstock should be large enough to support the scion, but it should not be so large that it dwarfs the scion. The second factor to consider is the shape of the tree. The rootstock should have a straight trunk and a well-developed root system. The third factor to consider is the vigor of the tree. The rootstock should be a vigorous grower, so that it can support the growth of the scion.

Scion: When choosing a scion, there are also a few factors to consider. The first is the size of the tree. The scion should be small enough to fit on the rootstock, but it should not be so small that it is overwhelmed by the rootstock. The second factor to consider is the shape of the tree. The scion should have a straight trunk and a well-developed branch structure. The third factor to consider is the vigor of the tree. The scion should be a vigorous grower, so that it can outgrow the rootstock and become the dominant part of the tree.

Factors to Consider When Choosing a Rootstock

Factors to Consider When Choosing a Rootstock

There are a few factors to consider when choosing a rootstock for bonsai. These factors include the size, shape, and vigor of the tree. You should also consider the compatibility of the rootstock with the scion.

Size: The size of the rootstock is important because it will determine the size of the finished bonsai tree. If you want a small bonsai tree, you will need to choose a small rootstock. If you want a larger bonsai tree, you can choose a larger rootstock. However, it is important to keep in mind that the rootstock should not be so large that it dwarfs the scion.

Shape: The shape of the rootstock is also important. The rootstock should have a straight trunk and a well-developed root system. This will help to ensure that the finished bonsai tree is stable and has a good foundation.

Vigor: The vigor of the rootstock is another important factor to consider. The rootstock should be a vigorous grower, so that it can support the growth of the scion. A weak or diseased rootstock will not be able to support the growth of the scion, and the graft will likely fail.

Factors to Consider When Choosing a Scion

Factors to Consider When Choosing a Scion

When choosing a scion for bonsai, you should consider the size, shape, and color of the leaves. You should also consider the flowering and fruiting habits of the tree.

Size: The size of the scion is important because it will determine the size of the finished bonsai tree. If you want a small bonsai tree, you will need to choose a small scion. If you want a larger bonsai tree, you can choose a larger scion. However, it is important to keep in mind that the scion should not be so large that it overwhelms the rootstock.

Shape: The shape of the scion is also important. The scion should have a straight trunk and a well-developed branch structure. This will help to ensure that the finished bonsai tree has a good shape and is visually appealing.

Color: The color of the scion’s leaves is also an important factor to consider. The color of the leaves will determine the overall appearance of the finished bonsai tree. If you want a bonsai tree with bright green leaves, you will need to choose a scion with bright green leaves. If you want a bonsai tree with dark green leaves, you will need to choose a scion with dark green leaves.

3. Preparing the Rootstock and Scion

Preparing the Rootstock and Scion

Once you have chosen the right rootstock and scion, the next step is to prepare the two trees for grafting. This involves cutting the rootstock and scion to the desired shape and size.

Preparing the Rootstock: To prepare the rootstock, you will need to make a clean, diagonal cut across the top of the tree. The cut should be about 1 inch long and should be made at a 45-degree angle. The cut should be made just above a node, which is the point where a leaf or branch grows from the trunk. Once the cut is made, you will need to remove any leaves or branches that are below the cut.

Preparing the Scion: To prepare the scion, you will need to make a matching diagonal cut on the bottom of the tree. The cut should be about 1 inch long and should be made at a 45-degree angle. The cut should be made just below a node. Once the cut is made, you will need to remove any leaves or branches that are below the cut.

Preparing the Rootstock

Preparing the Rootstock

To prepare the rootstock, you will need to cut a clean, diagonal cut across the top of the tree. The cut should be about 1 inch long and should be made at a 45-degree angle. The cut should be made just above a node, which is the point where a leaf or branch grows from the trunk. Once the cut is made, you will need to remove any leaves or branches that are below the cut.

The purpose of the diagonal cut is to create a larger surface area for the graft union. This will help to ensure that the graft is strong and secure. The cut should be made with a sharp knife or grafting tool. It is important to make a clean cut, as a jagged cut will make it more difficult for the graft to heal.

Once the rootstock is prepared, it is important to keep it moist until it is grafted. This can be done by wrapping the rootstock in a damp paper towel or placing it in a container of water.

Preparing the Scion

Preparing the Scion

To prepare the scion, you will need to cut a matching diagonal cut on the bottom of the tree. The cut should be about 1 inch long and should be made at a 45-degree angle. The cut should be made just below a node, which is the point where a leaf or branch grows from the trunk. Once the cut is made, you will need to remove any leaves or branches that are below the cut.

The purpose of the diagonal cut is to create a larger surface area for the graft union. This will help to ensure that the graft is strong and secure. The cut should be made with a sharp knife or grafting tool. It is important to make a clean cut, as a jagged cut will make it more difficult for the graft to heal.

Once the scion is prepared, it is important to keep it moist until it is grafted. This can be done by wrapping the scion in a damp paper towel or placing it in a container of water.

4. Performing the Graft

Performing the Graft

Once the rootstock and scion have been prepared, the next step is to perform the graft. This involves joining the two trees together using a grafting tape or wax.

Aligning the Rootstock and Scion: The first step is to align the rootstock and scion together. The cuts should be facing each other and the cambium layers of the two trees should be aligned. The cambium layer is a thin layer of cells that is responsible for growth. It is important to align the cambium layers of the two trees so that the graft can heal properly.

Joining the Rootstock and Scion: Once the rootstock and scion have been aligned, the next step is to join the two trees together. This can be done using a grafting tape or wax. Grafting tape is a self-adhesive tape that is used to hold the graft together. Grafting wax is a sticky substance that is used to seal the graft and prevent it from drying out.

Aligning the Rootstock and Scion

Aligning the Rootstock and Scion

The first step in performing a graft is to align the rootstock and scion together. The cuts on the rootstock and scion should be facing each other and the cambium layers of the two trees should be aligned. The cambium layer is a thin layer of cells that is responsible for growth. It is important to align the cambium layers of the two trees so that the graft can heal properly.

To align the rootstock and scion, hold the two trees together and match up the cuts. The cuts should fit together snugly. If the cuts do not fit together well, you may need to trim them slightly with a sharp knife. Once the cuts are aligned, hold the two trees together firmly and secure them with grafting tape or wax.

Joining the Rootstock and Scion

Joining the Rootstock and Scion

Once the rootstock and scion have been aligned, the next step is to join the two trees together. This can be done using a grafting tape or wax.

Grafting Tape: Grafting tape is a self-adhesive tape that is used to hold the graft together. It is important to use a grafting tape that is specifically designed for grafting, as other types of tape may not be strong enough to hold the graft in place. To apply the grafting tape, simply wrap it around the graft union, starting at the bottom and working your way up. Overlap the tape by about 50%, and make sure to press it down firmly to ensure that it is secure.

Grafting Wax: Grafting wax is a sticky substance that is used to seal the graft and prevent it from drying out. Grafting wax can be applied using a brush or your fingers. To apply the grafting wax, simply spread it over the graft union, making sure to cover all of the exposed wood. Once the grafting wax has been applied, you can wrap the graft union with grafting tape to further secure it.

5. Aftercare

Aftercare

After you have performed the graft, it is important to provide proper aftercare for the trees. This involves watering the trees regularly and keeping them in a warm, humid environment.

Watering the Trees: The trees should be watered regularly, especially during the first few weeks after the graft. The water should be applied at the base of the trees. Avoid getting the leaves wet, as this can promote disease.

Keeping the Trees in a Warm, Humid Environment: The trees should be kept in a warm, humid environment. This can be done by placing the trees in a greenhouse or by covering them with a plastic bag. The plastic bag should be kept open at the top to allow for air circulation.

Watering the Trees

Watering the Trees

The trees should be watered regularly, especially during the first few weeks after the graft. The water should be applied at the base of the trees. Avoid getting the leaves wet, as this can promote disease.

Watering the trees regularly will help to keep the graft union moist and promote healing. It is important to water the trees deeply, so that the water reaches the roots. Avoid overwatering the trees, as this can lead to root rot.

To water the trees, use a watering can or hose. Apply the water slowly and evenly to the base of the trees. Avoid getting the leaves wet, as this can promote disease. Water the trees until the water begins to drain out of the bottom of the pot.

Keeping the Trees in a Warm, Humid Environment

Keeping the Trees in a Warm, Humid Environment

The trees should be kept in a warm, humid environment. This can be done by placing the trees in a greenhouse or by covering them with a plastic bag. The plastic bag should be kept open at the top to allow for air circulation.

A warm, humid environment will help to promote healing of the graft union. The humidity will help to keep the graft union moist, and the warmth will help to speed up the healing process.

If you are using a greenhouse to keep the trees in a warm, humid environment, make sure that the greenhouse is well-ventilated. This will help to prevent the trees from overheating. If you are using a plastic bag to cover the trees, make sure that the bag is kept open at the top to allow for air circulation. Check the trees regularly to make sure that they are not getting too hot or too humid.

What is the best time of year to graft trees for bonsai?

The best time of year to graft trees for bonsai is in the spring or fall, when the trees are actively growing. Avoid grafting trees in the summer or winter, as the trees may not be able to heal properly during these times.

Can I graft any type of tree onto any other type of tree?

No, you cannot graft any type of tree onto any other type of tree. Trees that are closely related are more likely to be compatible for grafting. For example, you can graft an apple tree onto a crabapple tree, but you cannot graft an apple tree onto an oak tree.

How long does it take for a graft to heal?

The time it takes for a graft to heal depends on the type of graft and the compatibility of the trees. Some grafts may heal in a few weeks, while others may take several months or even years to heal completely.

What are some common problems that can occur when grafting trees?

Some common problems that can occur when grafting trees include: – The graft may not take, and the scion may die. – The graft may take, but the union may be weak and break easily. – The rootstock may overgrow the scion, and the scion may die. – Pests and diseases can attack the graft union.

What are some tips for successful grafting?

Here are some tips for successful grafting: – Use sharp tools and make clean cuts. – Align the cambium layers of the rootstock and scion. – Secure the graft with grafting tape or wax. – Keep the graft in a warm, humid environment. – Water the trees regularly.

Related Posts
Repotting Bonsai: A Comprehensive Guide to Nurture Healthy Growth

The Art of Bonsai Repotting: Nurturing Growth, Preserving Beauty Bonsai, the ancient art of cultivating miniature trees, requires meticulous care Read more

Fertilizing Bonsai: The Essential Guide to Keep Your Miniatures Thriving

The Art of Nourishing Miniature Masterpieces: A Comprehensive Guide to Bonsai Fertilization Fertilizing Bonsai: A Guide to Miniature Tree Maintenance Read more

7 Secret Tips for Growing a Thriving Bonsai Tree: Beginners Guide

Unveiling the Secrets: A Beginner's Journey into the Art of Bonsai Embark on the Enchanting Journey of Bonsai: A Beginner's Read more

Bonsai Watering 101: Everything You Need to Know

The Essential Guide to Bonsai Watering: Unlocking the Secrets of Miniature Tree Care Understanding the Art of Bonsai Watering: A Read more

Essential Bonsai Tools: The Ultimate Guide to Choosing the Right Equipment

Essential Bonsai Tools: A Gateway to Miniature Masterpieces

Essential Bonsai Tools: The Ultimate Guide to Choosing the Right Equipment

Stepping into the world of bonsai, enthusiasts embark on a journey of cultivating miniature trees, transforming nature’s grandeur into living art forms. At the heart of this practice lies the selection of essential tools, each playing a pivotal role in shaping, maintaining, and nurturing these captivating creations. From the precise cuts of pruning shears to the delicate touch of styling tweezers, the right tools empower bonsai artists to bring their visions to life, transforming ordinary trees into extraordinary works of art.

Unlocking the Art of Bonsai with the Right Tools

Choosing the appropriate bonsai tools is not merely a matter of acquiring equipment; it’s an investment in the health, beauty, and longevity of your miniature trees. With a wide array of tools available, selecting the right ones can be a daunting task. This comprehensive guide will navigate you through the essential tools for bonsai, empowering you to make informed decisions that will enhance your bonsai journey. From basic pruning tools to advanced styling instruments, we’ll explore their specific applications and how to choose the perfect fit for your needs. Whether you’re a seasoned bonsai enthusiast or just starting to explore this enchanting art form, this guide will provide you with the knowledge and insights to unlock your bonsai potential.

Subheading: Essential Bonsai Tools: A Gateway to Miniature Masterpieces

Embark on an exploration of the essential tools for bonsai, uncovering their significance and how they transform ordinary trees into living works of art. Discover the range of pruning tools, wiring instruments, styling aids, and maintenance equipment that empower bonsai artists. Learn how to choose the right tools for your specific needs, ensuring optimal results and unlocking the full potential of your miniature masterpieces.

1. Types of Essential Bonsai Tools

Types of Essential Bonsai Tools: Discover the Range of Essential Bonsai Tools, from Basic to Advanced, and Their Specific Applications in Shaping and Maintaining Bonsai Trees.

Bonsai, the ancient art of cultivating miniature trees, requires a specialized set of tools to effectively shape, prune, and maintain these living masterpieces. From basic tools for beginners to advanced instruments for experienced enthusiasts, each tool plays a vital role in the bonsai journey.

Essential Bonsai Tools for Shaping and Maintenance

Pruning Tools: – Scissors: Sharp, pointed scissors are used for precise cutting of small branches and leaves. – Shears: Long-handled shears with curved blades are ideal for trimming larger branches and shaping the overall form of the tree. – Saws: Small, fine-toothed saws are used for removing thicker branches or shaping deadwood.

Wiring Tools: – Pliers: Long-nosed pliers with fine tips are used for bending and shaping branches. – Wire Cutters: Specialized cutters are designed to cleanly cut bonsai wire without damaging the tree.

Styling Tools: – Tweezers: Fine-tipped tweezers are used for precise placement and shaping of leaves and small branches. – Root Hooks: Hook-shaped tools are used to gently tease out and shape the roots.

Maintenance Tools: – Watering Cans: Small, long-spouted watering cans are used for precise watering of bonsai trees. – Sprayers: Misting sprayers are used to maintain humidity and clean leaves. – Brushes: Soft brushes are used to gently remove dust and debris from the tree and its foliage.

Pruning Tools

Pruning Tools: Explore the Different Types of Pruning Tools, Including Scissors, Shears, and Saws, and How They Are Used for Precise Cutting and Shaping

Pruning is a crucial aspect of bonsai, allowing for the shaping and maintenance of the tree’s form and health. The choice of pruning tool depends on the size and type of branches being cut. Here’s an overview of the different types of pruning tools and their specific applications:

Scissors: – Ideal for precise cutting of small branches and leaves. – Sharp, pointed blades allow for clean and accurate cuts. – Commonly used for detailed work and shaping fine details.

Shears: – Long-handled shears with curved blades are designed for trimming larger branches. – The curved blades allow for a clean, concave cut that promotes healing. – Used for shaping the overall form of the tree and removing larger branches.

Saws: – Small, fine-toothed saws are used for removing thicker branches or shaping deadwood. – The fine teeth prevent tearing of the wood and ensure a clean cut. – Used for more drastic pruning or removing diseased or damaged branches.

When choosing pruning tools, it’s essential to consider the size and species of your bonsai tree. Smaller trees and delicate branches require finer tools, while larger trees with thicker branches may necessitate heavier-duty tools. Sharp, well-maintained tools are crucial for clean cuts and minimizing damage to the tree.

Wiring Tools

Wiring Tools: Understand the Purpose and Techniques of Wiring Tools, Such as Pliers and Wire Cutters, in Guiding and Training Bonsai Branches

Wiring is an essential technique in bonsai, used to shape and train branches, correct growth patterns, and create desired forms. Wiring tools, such as pliers and wire cutters, play a crucial role in this process:

Pliers: – Long-nosed pliers with fine tips are used for bending and shaping branches. – The fine tips allow for precise adjustments and minimize damage to the bark. – Used to create curves, angles, and other desired shapes in the branches.

Wire Cutters: – Specialized wire cutters are designed to cleanly cut bonsai wire without damaging the tree. – The sharp blades ensure a clean cut that prevents fraying or tearing of the wire. – Used to remove or adjust wire as needed during the training process.

Wiring techniques involve carefully wrapping thin, anodized aluminum wire around branches to guide their growth. The wire should be applied with gentle tension to avoid damaging the bark or restricting growth. Regular adjustments may be necessary as the tree grows and the branches develop.

Mastering wiring techniques is essential for creating and maintaining the desired form and structure of bonsai trees. Patience and practice are key to developing the skills necessary to effectively use wiring tools and achieve the intended results.

Styling Tools

Styling Tools: Learn about Styling Tools, Like Tweezers and Root Hooks, and Their Role in Shaping, Refining, and Enhancing the Overall Aesthetics of a Bonsai

Styling tools are essential for refining the details and enhancing the overall aesthetics of a bonsai tree. These tools allow for precise shaping, leaf arrangement, and root manipulation, contributing to the tree’s artistic appeal:

Tweezers: – Fine-tipped tweezers are used for precise placement and shaping of leaves and small branches. – The pointed tips allow for delicate adjustments and manipulation of individual leaves. – Used to create natural-looking arrangements and enhance the overall balance of the tree.

Root Hooks: – Hook-shaped tools are used to gently tease out and shape the roots. – The curved shape allows for careful manipulation of the roots without damaging them. – Used to expose roots for aesthetic purposes or to improve the tree’s stability.

Styling tools require a delicate touch and an understanding of the tree’s natural growth patterns. Careful and precise use of these tools allows bonsai enthusiasts to refine the tree’s form, highlight its unique features, and create a harmonious and visually appealing composition.

Maintenance Tools

Maintenance Tools: Discover Essential Maintenance Tools, Including Watering Cans, Sprayers, and Brushes, and Their Importance in Keeping Bonsai Trees Healthy and Thriving

Proper maintenance is crucial for the health and longevity of bonsai trees. Essential maintenance tools assist in providing the necessary care and ensuring optimal growing conditions:

Watering Cans: – Small, long-spouted watering cans are used for precise watering of bonsai trees. – The narrow spout allows for controlled and targeted watering, avoiding overwatering or root rot. – Regular watering is essential for maintaining the tree’s health and vitality.

Sprayers: – Misting sprayers are used to maintain humidity and clean leaves. – Regular misting helps to create a humid environment, which is beneficial for many bonsai species. – Spraying also helps to remove dust and debris from the leaves, promoting photosynthesis.

Brushes: – Soft brushes are used to gently remove dust and debris from the tree and its foliage. – Regular brushing helps to keep the tree clean and healthy, and prevents the accumulation of pests or diseases. – Brushing also helps to distribute natural oils throughout the leaves, enhancing their appearance.

By incorporating these essential maintenance tools into your bonsai care routine, you can ensure that your miniature trees receive the proper care and attention they need to thrive and flourish.

2. Choosing the Right Bonsai Tools for Your Needs

Choosing the Right Bonsai Tools for Your Needs: Factors to Consider When Selecting Bonsai Tools, Such as Tree Size, Species, and Skill Level, to Ensure Optimal Results

Selecting the appropriate bonsai tools is crucial for achieving optimal results in shaping, maintaining, and caring for your miniature trees. Several key factors should be considered to ensure you choose the right tools for your specific needs:

Tree Size: – The size of your bonsai tree will determine the size and type of tools you need. – Smaller trees require finer tools with delicate tips, while larger trees may necessitate heavier-duty tools. – Consider the thickness of branches and the overall scale of your tree when choosing pruning shears, wiring pliers, and other tools.

Tree Species: – Different tree species have unique characteristics that may require specialized tools. – For example, trees with delicate leaves may require finer scissors, while trees with thicker branches may need heavier shears. – Research the specific needs of your tree species to determine the most suitable tools.

Skill Level: – Your skill level and experience with bonsai will also influence your tool selection. – Beginners may prefer simpler tools with ergonomic designs, while experienced enthusiasts may opt for more advanced tools that offer greater precision and control. – Choose tools that are appropriate for your skill level to avoid potential damage to your bonsai tree.

By carefully considering these factors, you can ensure that you select the right bonsai tools for your needs, empowering you to effectively care for and shape your miniature masterpieces.

Matching Tool Size to Tree Size

Matching Tool Size to Tree Size: Understand the Relationship Between Tool Size and Tree Size, and How to Select Tools That Are Appropriately Scaled for Your Bonsai

When selecting bonsai tools, it is crucial to consider the size of your tree to ensure that you choose tools that are appropriately scaled. The size of the tools should be proportionate to the size of the tree, as using tools that are too large or too small can hinder your ability to work effectively and may even damage the tree.

Pruning Tools: – For smaller bonsai trees, delicate pruning scissors with fine tips are ideal for precise cutting of small branches and leaves. – For larger trees, heavier pruning shears with longer handles provide greater leverage for removing thicker branches. – Choose pruning tools that are the appropriate size for the thickness of the branches you need to cut.

Wiring Tools: – Wiring pliers should be small and lightweight, with fine tips for precise bending and shaping of branches. – The size of the pliers should be proportionate to the thickness of the wire you are using. – Using pliers that are too large can make it difficult to handle the wire and may damage the branches.

Styling Tools: – Styling tools, such as tweezers and root hooks, should also be sized appropriately for your bonsai tree. – Smaller tweezers with fine tips are suitable for delicate tasks like leaf arrangement, while larger tweezers may be needed for heavier branches. – Root hooks should be small enough to gently tease out and shape the roots without causing damage.

By matching the size of your tools to the size of your bonsai tree, you can ensure that you have the right tools for the job. This will allow you to work effectively and safely, helping you to achieve your desired results in shaping and maintaining your miniature masterpiece.

Considering Tree Species

Considering Tree Species: Explore How Different Tree Species May Require Specialized Tools Due to Variations in Branch Thickness, Leaf Size, and Growth Habits

Different tree species have unique characteristics that may require specialized bonsai tools for optimal care and shaping. These variations in branch thickness, leaf size, and growth habits necessitate careful consideration when selecting the appropriate tools:

Branch Thickness: – Trees with thick branches, such as oak or maple, require pruning shears with heavier blades and longer handles to provide sufficient leverage for cutting. – In contrast, trees with delicate branches, such as juniper or azalea, need finer pruning scissors with sharp tips for precise and clean cuts.

Leaf Size: – Trees with small leaves, such as boxwood or rosemary, benefit from the use of fine-tipped tweezers for precise leaf arrangement and shaping. – Larger-leaved trees, such as ficus or schefflera, may require broader tweezers or even small scissors for leaf pruning and shaping.

Growth Habits: – Trees with dense foliage, such as pines or junipers, may require specialized tools for removing excess foliage and shaping the canopy. – Deciduous trees, such as maples or elms, may need tools for pruning suckers and removing deadwood to maintain their natural growth habit.

By considering the unique characteristics of your bonsai tree species, you can select the most suitable tools for effective shaping, pruning, and maintenance, ensuring the health and beauty of your miniature masterpiece.

Assessing Skill Level

Assessing Skill Level: Determine the Appropriate Level of Tool Complexity Based on Your Experience and Skill Level to Avoid Potential Damage to Your Bonsai

Selecting bonsai tools that are appropriate for your skill level is crucial to avoid potential damage to your tree. Beginners may prefer simpler tools with ergonomic designs that are easy to handle and maneuver, while experienced enthusiasts may opt for more advanced tools that offer greater precision and control.

Beginners: – Start with basic tools that are designed for ease of use and safety. – Look for tools with comfortable handles and sharp blades or tips. – Avoid complex tools that require specialized skills or techniques to operate.

Intermediate: – As your skills progress, you can gradually introduce more advanced tools to your collection. – Consider tools with adjustable settings or interchangeable parts to enhance versatility. – Practice using new tools on less valuable trees before attempting delicate work on your prized bonsai.

Advanced: – Experienced enthusiasts may require specialized tools for intricate shaping and refinement. – These tools often feature precision blades, fine tips, and ergonomic designs for maximum control and accuracy. – Advanced tools should only be used by those with a deep understanding of bonsai techniques and a high level of skill.

By carefully assessing your skill level and selecting tools that are appropriate for your experience, you can minimize the risk of damaging your bonsai tree and ensure that you have the right tools to nurture and shape your miniature masterpiece.

3. Caring for and Maintaining Bonsai Tools

Caring for and Maintaining Bonsai Tools: Essential Practices for Maintaining Bonsai Tools in Optimal Condition, Ensuring Longevity and Effectiveness

Proper care and maintenance of your bonsai tools are essential to ensure their longevity and effectiveness. By following these essential practices, you can keep your tools in pristine condition, ensuring that they continue to perform at their best:

Cleaning and Sterilization: – Regularly clean your tools to remove dirt, sap, and debris. – Use a soft cloth or brush to gently wipe down the surfaces of your tools. – For more thorough cleaning, soak your tools in a mild disinfectant solution. – Sterilize your tools before and after each use to prevent the spread of diseases.

Sharpening and Maintenance: – Sharp tools are essential for clean and precise cuts and shaping. – Regularly sharpen your pruning shears, knives, and other cutting tools using a whetstone or sharpening stone. – Check your tools for any loose screws or damaged parts and tighten or replace them as needed. – Lubricate moving parts to ensure smooth operation and prevent wear and tear.

Storage and Organization: – Store your bonsai tools in a dry and secure location. – Use a tool roll or case to keep your tools organized and protected. – Keep your tools away from moisture and extreme temperatures to prevent rust and damage. – Regularly inspect your tools for any signs of wear or damage and address them promptly.

By following these essential practices, you can ensure that your bonsai tools remain in optimal condition, enabling you to continue shaping, pruning, and maintaining your miniature trees with precision and care.

Cleaning and Sterilization

Cleaning and Sterilization: Learn Proper Techniques for Cleaning and Sterilizing Bonsai Tools to Prevent Rust, Corrosion, and the Spread of Diseases

Regular cleaning and sterilization of your bonsai tools are essential to maintain their performance and prevent the spread of diseases. Follow these proper techniques to ensure your tools remain in optimal condition:

Cleaning: – Use a soft cloth or brush to gently wipe down the surfaces of your tools to remove dirt, sap, and debris. – For more thorough cleaning, soak your tools in a mild soap solution. – Rinse your tools thoroughly with clean water and dry them completely with a clean cloth. – Avoid using harsh detergents or abrasive cleaners, as these can damage the tools.

Sterilization: – Sterilization is crucial to prevent the spread of diseases from one tree to another. – Soak your tools in a disinfectant solution, such as 70% isopropyl alcohol or a bleach solution (1 part bleach to 9 parts water), for at least 10 minutes. – Rinse your tools thoroughly with clean water and dry them completely with a clean cloth. – Allow your tools to air dry completely before storing them.

Regular cleaning and sterilization will help to prevent rust, corrosion, and the spread of diseases, ensuring that your bonsai tools remain in pristine condition and ready to use.

Sharpening and Maintenance

Sharpening and Maintenance: Understand the Importance of Sharpening and Maintaining Bonsai Tools to Ensure Clean Cuts and Precise Shaping

Sharp, well-maintained bonsai tools are essential for clean cuts and precise shaping. Regular sharpening and proper maintenance will ensure that your tools perform at their best and produce optimal results:

Sharpening: – Sharp tools are crucial for making clean, precise cuts without damaging the tree’s tissues. – Use a whetstone or sharpening stone to sharpen your tools at the appropriate angle. – Start with a coarse stone to remove any nicks or burrs, then switch to a finer stone to create a sharp edge. – Regularly check the sharpness of your tools and sharpen them as needed.

Maintenance: – In addition to sharpening, regular maintenance is essential to keep your tools in good working condition. – Check your tools for any loose screws or damaged parts and tighten or replace them as needed. – Lubricate moving parts to ensure smooth operation and prevent wear and tear. – Store your tools in a dry and secure location to prevent rust and damage.

By following these sharpening and maintenance practices, you can ensure that your bonsai tools remain in optimal condition, allowing you to achieve precise shaping and beautiful results in your bonsai creations.

Storage and Organization

Storage and Organization: Discover Best Practices for Storing and Organizing Bonsai Tools to Maintain Their Functionality and Extend Their Lifespan

Proper storage and organization of your bonsai tools are essential to maintain their functionality and extend their lifespan. Follow these best practices to ensure your tools remain in optimal condition:

Storage: – Store your bonsai tools in a dry and secure location to prevent rust and damage. – Avoid storing your tools in damp or humid environments, as this can lead to corrosion. – Use a tool roll or case to keep your tools organized and protected. – Keep your tools away from extreme temperatures, as this can damage the materials.

Organization: – Keep your tools organized and easily accessible to save time and prevent frustration. – Use a toolbox or drawer with compartments to separate and store different types of tools. – Label your tools or compartments to quickly identify and retrieve the tool you need. – Regularly inspect your tools for any signs of damage or wear and address them promptly.

By following these storage and organization best practices, you can ensure that your bonsai tools remain in pristine condition, ready to use whenever you need them.

4. Additional Resources for Bonsai Tool Selection

Additional Resources for Bonsai Tool Selection: Explore External Resources, Including Websites, Forums, and Experts, to Gather Additional Insights on Choosing the Right Bonsai Tools

In addition to the information provided in this article, there are several external resources available to help you gather more insights and make informed decisions about choosing the right bonsai tools:

Websites: – Bonsai Empire (https://www.bonsaiempire.com/): Offers comprehensive articles, videos, and forums dedicated to bonsai tools and their selection. – Bonsai Tonight (https://www.bonsaitonight.com/): Provides detailed reviews and recommendations for various types of bonsai tools. – Stone Lantern (https://www.stonelantern.com/): Features a wide range of bonsai tools and resources, including buying guides and expert advice.

Forums: – Bonsai Nut (https://www.bonsai-nut.com/forums/): An active forum where bonsai enthusiasts share their experiences and recommendations on bonsai tools. – Bonsai4me (https://www.bonsai4me.com/forums/): Another popular forum with a dedicated section for discussions on bonsai tools and their selection.

Experts: – Consult with experienced bonsai artists or professionals at local bonsai nurseries or clubs. – Attend bonsai workshops or demonstrations to learn more about tool selection and techniques from experts.

These additional resources provide valuable insights and expert advice to complement the information presented in this article. By exploring these resources, you can further enhance your knowledge and make informed decisions about choosing the right bonsai tools for your needs.

Online Forums and Communities

Online Forums and Communities: Engage with Experienced Bonsai Enthusiasts in Online Forums and Communities to Seek Advice and Share Knowledge on Tool Selection

Online forums and communities provide a valuable platform to connect with experienced bonsai enthusiasts and seek advice on tool selection. These platforms foster a sense of community and offer a wealth of knowledge and insights:

Seeking Advice: – Join online forums dedicated to bonsai, such as Bonsai Nut (https://www.bonsai-nut.com/forums/) or Bonsai4me (https://www.bonsai4me.com/forums/). – Post questions about specific tool choices, techniques, or recommendations for different tree species. – Engage with other members to gain diverse perspectives and learn from their experiences.

Sharing Knowledge: – Share your own knowledge and experiences with bonsai tools to contribute to the community. – Answer questions from other members and provide helpful insights based on your expertise. – Participate in discussions and share your favorite tool brands, tips, and techniques.

Networking: – Connect with other bonsai enthusiasts who share your passion for the art form. – Build relationships with experienced practitioners who can offer valuable guidance and support. – Attend virtual or in-person meetups organized by these communities to further expand your network.

By actively participating in online forums and communities, you can tap into a wealth of knowledge and connect with like-minded individuals. These platforms provide a dynamic and supportive environment for bonsai enthusiasts to learn, share, and grow together in their pursuit of mastering the art of bonsai.

Bonsai Tool Retailers

Bonsai Tool Retailers: Visit Reputable Bonsai Tool Retailers to Compare Products, Consult with Experts, and Make Informed Purchasing Decisions

Visiting reputable bonsai tool retailers offers numerous advantages when selecting the right tools for your needs. These retailers provide a comprehensive range of products, expert advice, and a hands-on experience to help you make informed purchasing decisions:

Product Comparison: – Visit physical stores or browse online catalogs to compare a wide variety of bonsai tools from different manufacturers. – Examine the quality, materials, and craftsmanship of each tool to determine which ones best suit your requirements. – Compare prices and features to find the best value for your money.

Expert Advice: – Consult with knowledgeable staff at bonsai tool retailers who can provide expert advice and recommendations. – Discuss your specific needs and preferences to receive personalized guidance on tool selection. – Ask questions about tool maintenance, sharpening techniques, and any other concerns you may have.

Hands-on Experience: – Many bonsai tool retailers allow customers to handle and test the tools before purchasing. – This hands-on experience provides valuable insights into the ergonomics, weight, and feel of each tool. – You can also observe demonstrations or attend workshops to learn proper tool techniques.

By visiting reputable bonsai tool retailers, you can benefit from expert advice, compare products side-by-side, and make informed decisions based on your individual requirements. This ensures that you invest in the right tools that will enhance your bonsai journey and help you achieve your desired results.

Bonsai Tool Demonstrations

Bonsai Tool Demonstrations: Attend Bonsai Tool Demonstrations or Workshops Led by Experienced Professionals to Gain Hands-on Experience and Learn Proper Techniques

Attending bonsai tool demonstrations or workshops provides an invaluable opportunity to gain hands-on experience and learn proper techniques from experienced professionals. These events offer a unique and immersive learning environment:

Hands-on Experience: – Participate in hands-on demonstrations where experts showcase the proper use of various bonsai tools. – Practice techniques such as pruning, wiring, and styling under the guidance of experienced practitioners. – Receive personalized feedback and refine your skills in a supportive and educational setting.

Proper Techniques: – Learn the correct techniques for handling and using bonsai tools to ensure the health and well-being of your trees. – Discover advanced techniques and tips to enhance your bonsai skills and achieve desired results. – Gain insights into the principles and philosophies behind bonsai tool usage.

Expert Insights: – Engage with experienced bonsai artists and professionals who share their knowledge and insights. – Ask questions, learn from their experiences, and benefit from their expertise. – Build connections with other bonsai enthusiasts and expand your network.

By attending bonsai tool demonstrations or workshops, you can elevate your bonsai skills, learn from the best in the field, and gain practical experience that will benefit your bonsai journey for years to come.

5. Conclusion: Unlocking the Art of Bonsai with the Right Tools

Conclusion: Unlocking the Art of Bonsai with the Right Tools: Reiterate the Significance of Selecting the Appropriate Bonsai Tools, Emphasizing Their Impact on the Overall Success and Enjoyment of the Bonsai Journey

Choosing the right bonsai tools is not merely a matter of acquiring equipment; it’s an investment in the health, beauty, and longevity of your miniature trees. The appropriate tools empower bonsai artists to bring their visions to life, transforming ordinary trees into extraordinary works of art. From the precise cuts of pruning shears to the delicate touch of styling tweezers, each tool plays a pivotal role in shaping, maintaining, and nurturing these captivating creations.

Embarking on the bonsai journey without the right tools is akin to setting sail on a voyage without a compass. While passion and dedication are essential, the judicious selection of tools provides the necessary guidance and precision to navigate the intricacies of bonsai cultivation. With the right tools in hand, you unlock the potential to create harmonious compositions, showcase the natural beauty of your trees, and derive immense satisfaction from your bonsai endeavors. Remember, the art of bonsai is a journey of patience, observation, and refinement. By investing in the right tools, you lay the foundation for a successful and fulfilling bonsai journey.

As you progress in your bonsai practice, your understanding of the delicate balance between tree and tool will deepen. You will discover that the right tools not only enhance your ability to shape and style your trees but also foster a deeper connection with the art form itself. Embrace the opportunity to explore different tools, learn from experienced practitioners, and refine your techniques. With dedication and the right tools, the art of bonsai becomes a transformative experience, bringing joy, tranquility, and a profound appreciation for the beauty of nature.

What are some essential bonsai tools for beginners?

For beginners, essential bonsai tools include pruning shears, wiring pliers, tweezers, and a watering can. These tools allow for basic shaping, pruning, and maintenance of bonsai trees.

How often should I sharpen my bonsai tools?

The frequency of sharpening depends on the usage and type of tool. Generally, it’s recommended to sharpen your tools after every few uses or when you notice a decrease in sharpness. Regular sharpening ensures clean cuts and prevents damage to your trees.

How can I store my bonsai tools properly?

Store your bonsai tools in a dry and secure location, away from moisture and extreme temperatures. Use a tool roll or case to keep your tools organized and protected. Proper storage helps prevent rust, corrosion, and damage, ensuring the longevity of your tools.

Where can I find reputable bonsai tool retailers?

There are several reputable bonsai tool retailers both online and offline. Look for retailers that offer a wide selection of high-quality tools, knowledgeable staff, and positive customer reviews. Attend bonsai exhibitions or workshops to connect with retailers and examine their products firsthand.

What are the benefits of attending bonsai tool demonstrations or workshops?

Attending bonsai tool demonstrations or workshops provides hands-on experience, expert guidance, and an opportunity to learn proper techniques. These events allow you to interact with experienced professionals, refine your skills, and gain valuable insights into the art of bonsai tool usage.

Related Posts
Repotting Bonsai: A Comprehensive Guide to Nurture Healthy Growth

The Art of Bonsai Repotting: Nurturing Growth, Preserving Beauty Bonsai, the ancient art of cultivating miniature trees, requires meticulous care Read more

Fertilizing Bonsai: The Essential Guide to Keep Your Miniatures Thriving

The Art of Nourishing Miniature Masterpieces: A Comprehensive Guide to Bonsai Fertilization Fertilizing Bonsai: A Guide to Miniature Tree Maintenance Read more

7 Secret Tips for Growing a Thriving Bonsai Tree: Beginners Guide

Unveiling the Secrets: A Beginner's Journey into the Art of Bonsai Embark on the Enchanting Journey of Bonsai: A Beginner's Read more

Bonsai Watering 101: Everything You Need to Know

The Essential Guide to Bonsai Watering: Unlocking the Secrets of Miniature Tree Care Understanding the Art of Bonsai Watering: A Read more

Neutral Title TBD

Air Layering for Bonsai: A Comprehensive Guide to Propagation and Artistic Expression

Air layering is a unique plant propagation technique useful in bonsai cultivation. This guide delves into the concept of air layering, essential tools and materials needed, a step-by-step guide for beginners, potential challenges and solutions, and creative applications in bonsai art. Embracing this technique empowers enthusiasts to expand their bonsai collection, enhance existing trees, and explore artistic possibilities, ultimately deepening their connection with the art of bonsai.

1. Understanding What is Air Layering and Its Benefits?

Air layering is a specialized plant propagation technique commonly used in horticulture and bonsai cultivation. It involves encouraging root growth on a stem or branch while it is still attached to the parent plant. By manipulating the plant’s natural processes, air layering offers several advantages:

  • Higher success rate: Air layering bypasses the challenges of traditional propagation methods, such as cuttings or grafting, which can be more difficult and less successful, especially with certain plant species.
  • Preservation of cultivar characteristics: Air layering ensures the genetic integrity of the new plant, as it is an exact clone of the parent plant, preserving desirable traits and characteristics.
  • Propagation of difficult-to-root plants: Some plant species or cultivars are notoriously difficult to propagate through conventional methods. Air layering provides an alternative approach to successfully propagate these plants by inducing root growth on branches that may not root easily otherwise.
  • Control over root placement: Air layering allows the grower to control the location of the new root system. This is particularly useful in bonsai cultivation, where specific root placement can influence the overall shape and aesthetics of the tree.
  • Non-destructive propagation: Unlike other propagation methods like cuttings or division, air layering does not require the removal of the propagated plant from the parent plant. This allows for continuous growth and development of both the parent plant and the new plant simultaneously.

What is Air Layering?

Air layering is a plant propagation technique that involves inducing root growth on a stem or branch while it is still attached to the parent plant. This is achieved by removing a ring of bark and applying a rooting hormone to the exposed area. The伤口 is then covered with moist sphagnum moss and wrapped in plastic to maintain humidity. Over time, roots will develop at the site of the wound, and once a sufficient root system has formed, the rooted stem can be severed from the parent plant and potted up on its own.

Air layering offers several advantages over traditional propagation methods, such as cuttings or grafting:

  • Higher success rate: Air layering bypasses the challenges of traditional propagation methods, such as cuttings or grafting, which can be more difficult and less successful, especially with certain plant species.
  • Preservation of cultivar characteristics: Air layering ensures the genetic integrity of the new plant, as it is an exact clone of the parent plant, preserving desirable traits and characteristics.
  • Propagation of difficult-to-root plants: Some plant species or cultivars are notoriously difficult to propagate through conventional methods. Air layering provides an alternative approach to successfully propagate these plants by inducing root growth on branches that may not root easily otherwise.
  • Control over root placement: Air layering allows the grower to control the location of the new root system. This is particularly useful in bonsai cultivation, where specific root placement can influence the overall shape and aesthetics of the tree.
  • Non-destructive propagation: Unlike other propagation methods like cuttings or division, air layering does not require the removal of the propagated plant from the parent plant. This allows for continuous growth and development of both the parent plant and the air layered branch simultaneously.

Air layering is compatible with a wide range of both deciduous and evergreen plants, including:

  • Ficus
  • Schefflera
  • Hibiscus
  • Rhododendron
  • Azalea
  • Camellia
  • Juniper
  • Pine
  • Spruce
  • Fir

Advantages of Air Layering in Bonsai Cultivation

Air layering offers several unique advantages for bonsai cultivation, including:

  • Better root quality: Air layering allows the roots to develop in a controlled environment, protected from the elements and pests. This results in a more developed and fibrous root system, which is essential for a healthy and stable bonsai tree.
  • Retention of cultivar characteristics: Air layering ensures the genetic integrity of the new bonsai tree, as it is an exact clone of the parent tree. This is important for preserving desirable traits and characteristics, such as leaf size, shape, and color.
  • Propagation of difficult-to-root branches: Some branches on a bonsai tree may be difficult or impossible to root using traditional propagation methods. Air layering provides an alternative approach to successfully propagate these branches by inducing root growth directly on the branch while it is still attached to the parent tree.

In addition to these advantages, air layering is also a relatively simple and straightforward technique that can be performed by bonsai enthusiasts of all levels of experience. It is a valuable tool for expanding a bonsai collection, experimenting with different cultivars, and creating unique and artistic bonsai specimens.

2. Essential Tools and Materials for Air Layering

Successful air layering requires a few essential tools and materials:

  • Sharp knife or scalpel: A sharp knife or scalpel is necessary for making a clean cut on the branch where the air layer will be performed. A clean cut will help to prevent infection and promote root growth.
  • Rooting hormone: Rooting hormone is a powder or gel that is applied to the cut surface of the branch to encourage root growth. There are many different types of rooting hormones available, so it is important to choose one that is specifically designed for air layering.
  • Sphagnum moss: Sphagnum moss is a type of moss that is often used in air layering because it is highly absorbent and retains moisture well. It is important to use fresh, clean sphagnum moss for air layering to avoid introducing any diseases or pests to the plant.
  • Plastic wrap: Plastic wrap is used to create a humid environment around the air layer, which is necessary for root growth. The plastic wrap should be clear so that you can monitor the progress of the air layer.
  • Transparent bag: A transparent bag is used to enclose the air layer and create a humid environment. The bag should be large enough to fit the air layer comfortably, and it should have holes punched in it to allow for air circulation.

In addition to these essential tools and materials, you may also want to use the following items:

  • Pruning shears: Pruning shears can be used to remove any leaves or branches from the section of the branch where the air layer will be performed.
  • Scissors: Scissors can be used to cut the plastic wrap and the transparent bag.
  • Tape: Tape can be used to secure the plastic wrap and the transparent bag.

Scalpel or Sharp Knife

When performing air layering, it is important to use a sharp knife or scalpel to make a clean cut on the branch. A clean cut will help to prevent infection and promote root growth. Here are some tips for making a clean cut:

  • Use a sharp knife or scalpel: A dull knife will crush the plant tissue, making it more susceptible to infection and disease. A sharp knife will make a clean cut that will heal quickly and promote root growth.
  • Make a斜 cut: A斜 cut will provide a larger surface area for the roots to grow on. To make a斜 cut, hold the knife or scalpel at a 45-degree angle to the branch and cut upwards into the branch.
  • Cut through the bark and cambium layer: The cambium layer is the layer of tissue just beneath the bark that produces new cells. When making the cut, be sure to cut through the bark and into the cambium layer, but avoid cutting into the wood.
  • Remove any leaves or buds from the cut area: Any leaves or buds that are left on the cut area can阻碍 root growth. Use pruning shears or scissors to remove any leaves or buds from the cut area.

Once you have made a clean cut, you can apply rooting hormone to the cut surface and wrap the area with moist sphagnum moss.

Rooting Hormone

Rooting hormones are substances that promote root development on cuttings and air layers. They work by stimulating the plant to produce more auxin, which is a plant hormone that plays a role in root growth. There are two main types of rooting hormones: synthetic and natural.

  • Synthetic rooting hormones: Synthetic rooting hormones are man-made chemicals that are designed to mimic the effects of natural auxin. They are typically more concentrated than natural rooting hormones and can be more effective at promoting root growth.
  • Natural rooting hormones: Natural rooting hormones are derived from plants and contain auxin or other plant hormones that promote root growth. They are typically less concentrated than synthetic rooting hormones and may be less effective at promoting root growth, but they are also less likely to cause side effects.

Rooting hormones can be applied to cuttings and air layers in a variety of ways, including:

  • Dipping: The cut end of the cutting or air layer can be dipped into a solution of rooting hormone. This is a simple and effective way to apply rooting hormone, but it is important to make sure that the cut end is completely covered with the solution.
  • Dusting: Rooting hormone can be dusted onto the cut end of the cutting or air layer. This is a less messy way to apply rooting hormone, but it is important to make sure that the cut end is evenly coated with the powder.
  • Gel: Rooting hormone can be applied to the cut end of the cutting or air layer using a gel. Gels are more concentrated than solutions or powders, so they can be more effective at promoting root growth. However, they can also be more expensive and difficult to apply.

Once you have applied rooting hormone to the cut end of the cutting or air layer, you can wrap the area with moist sphagnum moss and secure it with plastic wrap. The sphagnum moss will help to keep the area moist and promote root growth.

It is important to note that rooting hormones can be harmful if they are ingested or inhaled. Be sure to wear gloves and a mask when applying rooting hormones, and wash your hands thoroughly afterwards.

Sphagnum Moss

Sphagnum moss is a type of moss that is often used in air layering because it is highly absorbent and retains moisture well. It is also breathable, which allows air to circulate around the roots and prevents them from rotting. In addition, sphagnum moss is naturally acidic, which helps to prevent the growth of bacteria and fungi.

Here are some of the benefits of using sphagnum moss as a growth medium for air layering:

  • High water retention: Sphagnum moss can hold up to 20 times its weight in water, which helps to keep the air layer moist and promote root growth.
  • Breathability: Sphagnum moss is a breathable material, which allows air to circulate around the roots and prevents them from rotting.
  • Acidity: Sphagnum moss is naturally acidic, which helps to prevent the growth of bacteria and fungi.
  • Antimicrobial properties: Sphagnum moss contains antimicrobial compounds that help to protect the air layer from infection.
  • Slow decomposition: Sphagnum moss decomposes slowly, which means that it can be used for a long period of time without needing to be replaced.

To use sphagnum moss for air layering, simply soak it in water until it is fully hydrated. Then, wrap the sphagnum moss around the cut area of the branch and secure it with plastic wrap. The sphagnum moss will help to keep the area moist and promote root growth.

Sphagnum moss is a versatile and effective growth medium for air layering. It is highly absorbent, breathable, and naturally acidic, which makes it ideal for promoting root growth and preventing infection.

Plastic Wrap

Plastic wrap plays an important role in air layering by maintaining humidity and preventing dehydration. Here’s how it works:

  • Maintaining humidity: Plastic wrap creates a humid environment around the air layer, which is essential for root growth. Roots need moisture to grow, and plastic wrap helps to keep the air around the air layer moist.
  • Preventing dehydration: Plastic wrap also prevents the air layer from drying out. When the air is dry, the roots can become dehydrated and die. Plastic wrap helps to keep the air layer moist, which prevents the roots from drying out.

To use plastic wrap for air layering, simply wrap it around the air layer and secure it with tape. Be sure to leave a few small holes in the plastic wrap to allow for air circulation.

Plastic wrap is an essential tool for air layering. It helps to maintain humidity and prevent dehydration, which are both essential for root growth.

Transparent Bag

A transparent bag is used to create an enclosed environment around the air layer. This enclosed environment helps to increase humidity and prevent dehydration, which are both essential for root growth. In addition, the transparent bag allows you to observe the rooting progress without having to remove the plastic wrap.

Here’s how to use a transparent bag for air layering:

  1. Wrap the air layer with plastic wrap and secure it with tape. Be sure to leave a few small holes in the plastic wrap to allow for air circulation.
  2. Place the air layer in a transparent bag and seal the bag closed. Be sure to leave a few small holes in the bag to allow for air circulation.
  3. Place the bag in a warm, well-lit location.

The transparent bag will help to maintain humidity and prevent dehydration, which are both essential for root growth. In addition, the transparent bag will allow you to observe the rooting progress without having to remove the plastic wrap.

Once the roots have developed, you can remove the air layer from the transparent bag and pot it up in soil.

3. Step-by-Step Guide to Air Layering for Bonsai

Air layering is a plant propagation technique that involves inducing root growth on a stem or branch while it is still attached to the parent plant. This allows you to create new plants that are genetically identical to the parent plant. Air layering is a relatively simple technique that can be performed by beginners and experienced practitioners alike. Here is a step-by-step guide to air layering for bonsai:

Step 1: Select the right branch

The first step is to select the right branch for air layering. The branch should be healthy and have a diameter of at least 1/2 inch. It should also be located in a position where it can be easily accessed and manipulated.

Step 2: Prepare the layering site

Once you have selected the branch, you need to prepare the layering site. This involves removing the leaves from the section of the branch where the air layer will be performed and making a clean cut through the bark and into the cambium layer. The cut should be about 1 inch long and should be made at a 45-degree angle.

Step 3: Apply rooting hormone

Once you have made the cut, you need to apply rooting hormone to the cut surface. Rooting hormone is a powder or gel that helps to promote root growth. Be sure to follow the manufacturer’s instructions for applying the rooting hormone.

Step 4: Wrap the layering site with sphagnum moss

Once you have applied the rooting hormone, you need to wrap the layering site with sphagnum moss. Sphagnum moss is a type of moss that is highly absorbent and retains moisture well. It is ideal for use in air layering because it helps to keep the layering site moist and promotes root growth.

Step 5: Enclose the air layer

Once you have wrapped the layering site with sphagnum moss, you need to enclose the air layer in a transparent bag. The transparent bag will help to maintain humidity and prevent dehydration. Be sure to leave a few small holes in the bag to allow for air circulation.

Selecting the Right Branch

When selecting a branch for air layering, it is important to choose a healthy branch that is of suitable diameter and has the potential to develop roots. Here are some tips for selecting the right branch for air layering:

  • Choose a healthy branch: The branch should be free of pests and diseases and should have a healthy green color. Avoid branches that are weak, brittle, or have any signs of damage.
  • Choose a branch of suitable diameter: The branch should be at least 1/2 inch in diameter. Branches that are too thin may not be able to support the weight of the new plant, and branches that are too thick may be difficult to root.
  • Choose a branch that has the potential to develop roots: Some branches are more likely to develop roots than others. Branches that are located in the middle of the tree and have a good supply of water and nutrients are more likely to root successfully.

Once you have selected a branch for air layering, you need to assess its suitability. Here are some things to look for:

  • The branch should be flexible: The branch should be flexible enough to bend without breaking. This is important because you will need to bend the branch to create the air layer.
  • The branch should have a smooth bark: The bark of the branch should be smooth and free of any bumps or irregularities. This will make it easier to make a clean cut and apply the rooting hormone.
  • The branch should be located in a position where it can be easily accessed and manipulated: The air layer will need to be monitored and maintained for several weeks, so it is important to choose a branch that is located in a position where it can be easily accessed and manipulated.

Preparing the Layering Site

Once you have selected a branch for air layering, you need to prepare the layering site. Here are the steps involved in preparing the layering site:

  1. Remove the leaves: Remove the leaves from the section of the branch where the air layer will be performed. This will help to reduce water loss and promote root growth.
  2. Create a clean cut: Make a clean cut through the bark and into the cambium layer of the branch. The cut should be about 1 inch long and should be made at a 45-degree angle. Avoid cutting into the wood of the branch.
  3. Apply rooting hormone: Apply rooting hormone to the cut surface of the branch. Rooting hormone is a powder or gel that helps to promote root growth. Be sure to follow the manufacturer’s instructions for applying the rooting hormone.
  4. Wrap the layering site with sphagnum moss: Wrap the layering site with sphagnum moss. Sphagnum moss is a type of moss that is highly absorbent and retains moisture well. It is ideal for use in air layering because it helps to keep the layering site moist and promotes root growth.

Once you have prepared the layering site, you need to enclose the air layer in a transparent bag. The transparent bag will help to maintain humidity and prevent dehydration. Be sure to leave a few small holes in the bag to allow for air circulation.

Enclosing the Air Layer

Once you have prepared the layering site and wrapped it with sphagnum moss, you need to enclose the air layer. Here are the steps involved in enclosing the air layer:

  1. Secure the sphagnum moss with plastic wrap: Wrap the sphagnum moss with plastic wrap and secure it with tape. Be sure to leave a few small holes in the plastic wrap to allow for air circulation.
  2. Enclose the air layer within a clear bag: Place the air layer in a clear bag and seal the bag closed. Be sure to leave a few small holes in the bag to allow for air circulation.
  3. Monitor the humidity: The humidity inside the bag should be kept at around 80%. You can monitor the humidity using a hygrometer or by simply observing the condensation on the inside of the bag. If the humidity drops below 80%, you can add a little bit of water to the bag.

Once you have enclosed the air layer, you need to place it in a warm, well-lit location. The air layer will need to be monitored and maintained for several weeks until the roots have developed.

Checking Root Formation and Removal

Once you have enclosed the air layer, you need to check it periodically for root formation. Here are the steps involved in checking root formation and removing the rooted layer:

  1. Check for root formation: You can check for root formation by gently squeezing the sphagnum moss around the air layer. If you feel any resistance, it means that roots have started to develop.
  2. Wait until the roots are developed: Once you haveを確認d that roots have started to develop, you need to wait until the roots are fully developed before you remove the air layer from the parent plant. The roots should be at least 1 inch long and should be white and healthy.
  3. Sever the rooted layer: Once the roots are fully developed, you can sever the rooted layer from the parent plant. Use a sharp knife or pruning shears to make a clean cut just below the roots.
  4. Pot the rooted layer: Once you have severed the rooted layer from the parent plant, you can pot it up in soil. Be sure to use a well-draining potting mix and to keep the soil moist but not soggy.

Potting and Care

Once you have removed the rooted layer from the parent plant, you need to pot it up in soil. Here are the steps involved in potting and caring for the newly rooted plant:

  1. Choose a suitable pot: Choose a pot that is slightly larger than the root ball of the plant. The pot should have drainage holes to prevent the soil from becoming waterlogged.
  2. Use a well-draining potting mix: Use a well-draining potting mix that is specifically designed for bonsai trees. Bonsai potting mixes typically contain a mixture of inorganic materials, such as akadama and pumice, and organic materials, such as peat moss and compost.
  3. Plant the rooted layer: Plant the rooted layer in the pot and gently firm the soil around the roots. Be sure to water the plant thoroughly after planting.
  4. Provide adequate water: Water the plant regularly, but avoid overwatering. The soil should be kept moist but not soggy.
  5. Protect from direct sunlight: Protect the plant from direct sunlight for the first few weeks after potting. You can place the plant in a shady location or under a shade cloth.

With proper care, the newly rooted plant will eventually establish itself and begin to grow new leaves and branches.

4. Troubleshooting Air Layering Problems

Air layering is a relatively simple and straightforward technique, but there are a few potential challenges and complications that can occur. Here are some common air layering problems and how to address them:

Problem: No root formation

Possible causes:

  • The branch was not suitable for air layering.
  • The cut was not made correctly.
  • The rooting hormone was not applied properly.
  • The air layer was not kept moist.

Solutions:

  • Choose a healthy branch that is of suitable diameter and has the potential to develop roots.
  • Make a clean cut through the bark and into the cambium layer of the branch.
  • Apply rooting hormone to the cut surface of the branch according to the manufacturer’s instructions.
  • Keep the air layer moist by wrapping it with sphagnum moss and enclosing it in a transparent bag.

Problem: Rot or infection

Possible causes:

  • The sphagnum moss was not clean.
  • The air layer was not enclosed properly.
  • The air layer was overwatered.

Solutions:

  • Use clean sphagnum moss for air layering.
  • Enclose the air layer in a transparent bag to create a humid environment.
  • Avoid overwatering the air layer. Allow the sphagnum moss to dry out slightly between waterings.

Problem: Weak roots

Possible causes:

  • The air layer was not exposed to enough light.
  • The air layer was not given enough time to develop roots.

Solutions:

  • Place the air layer in a warm, well-lit location.
  • Give the air layer enough time to develop roots. Do not remove the air layer from the parent plant until the roots are fully developed.

No Root Formation

If you are having trouble getting your air layers to root, there are a few possible factors that could be contributing to the problem. Here are some of the most common Ursachen for no root formation in air layering:

  • Environmental conditions: Air layers need a warm, humid environment to develop roots. If the air is too dry or too cold, the roots will not be able to form. Make sure to keep the air layer enclosed in a transparent bag to create a humid environment.
  • Incorrect technique: If the air layer is not prepared correctly, the roots will not be able to form. Make sure to make a clean cut through the bark and into the cambium layer of the branch. Apply rooting hormone to the cut surface of the branch according to the manufacturer’s instructions. Wrap the air layer with sphagnum moss and secure it with plastic wrap.
  • Unsuitable branches: Not all branches are suitable for air layering. Some branches are more likely to develop roots than others. Choose a healthy branch that is of suitable diameter and has the potential to develop roots.

If you have followed all of the instructions carefully and you are still not getting any root formation, you may want to try a different branch or a different technique.

Rot or Infection

Rot and infection are two of the most common problems that can occur during air layering. Here are some of the most common causes of decay and infection in air layers, as well as some preventive measures and treatment options:

Causes of decay and infection:

  • Dirty sphagnum moss: Sphagnum moss can harbor bacteria and fungi that can cause rot and infection. It is important to use clean sphagnum moss for air layering.
  • Improperly enclosed air layer: If the air layer is not enclosed properly, it can allow bacteria and fungi to enter and cause infection.
  • Overwatering: Overwatering can lead to root rot and other problems. Allow the sphagnum moss to dry out slightly between waterings.

Preventive measures:

  • Use clean sphagnum moss for air layering.
  • Enclose the air layer in a transparent bag to create a humid environment.
  • Avoid overwatering the air layer.

Treatment options:

  • If you发现 any signs of rot or infection, remove the affected tissue and treat the air layer with a fungicide.
  • If the rot or infection is severe, you may need to remove the entire air layer.

Weak Roots

If the roots on your air layers are weak or underdeveloped, there are a few possible reasons. Here are some of the most common causes of weak roots in air layers, as well as some tips on how to avoid them:

  • Inadequate exposure to moisture: Air layers need to be kept moist in order to develop roots. If the air layer is not kept moist, the roots will not be able to develop properly.
  • Limited rooting zone: The rooting zone is the area of the air layer that is in contact with the sphagnum moss. If the rooting zone is too small, the roots will not have enough space to develop properly.
  • Improper care post-removal: Once the air layer has developed roots, it is important to care for it properly. If the air layer is not cared for properly, the roots may be damaged or stunted.

Here are some tips on how to avoid weak roots in air layers:

  • Keep the air layer moist by wrapping it with sphagnum moss and enclosing it in a transparent bag.
  • Make sure the rooting zone is large enough to accommodate the roots.
  • Once the air layer has developed roots, pot it up in a well-draining potting mix and keep it moist but not soggy.

5. Benefits and Applications of Air Layering in Bonsai

Air layering is a versatile technique that can be used in a variety of ways to create unique and beautiful bonsai trees. Here are a few examples of how air layering is used creatively in bonsai:

  • Creating new bonsai trees: Air layering is a great way to create new bonsai trees from your existing trees. By air layering a branch, you can create a new tree that is genetically identical to the parent tree.
  • Filling empty spaces: Air layering can be used to fill empty spaces in the canopy of a bonsai tree. By air layering a branch and training it to grow in a specific direction, you can fill in gaps and create a more balanced and visually appealing tree.
  • Changing the tree’s shape: Air layering can be used to change the shape of a bonsai tree. By air layering branches and training them to grow in different directions, you can create unique and artistic bonsai trees.
  • Creating unique forms: Air layering can be used to create unique and unusual bonsai forms. For example, you can air layer a branch and train it to grow into a cascade or a twin-trunked tree.

Air layering is a powerful technique that can be used to create beautiful and unique bonsai trees. With a little creativity and patience, you can use air layering to achieve your desired results.

Creating New Bonsai Trees

Air layering is a great way to propagate desirable bonsai cultivars and expand your bonsai collection. By air layering a branch from a desirable tree, you can create a new tree that is genetically identical to the parent tree. This is especially useful for propagating rare or difficult-to-root cultivars.

To air layer a bonsai tree, you will need to make a clean cut through the bark of the branch and apply rooting hormone to the cut surface. Then, wrap the cut area with sphagnum moss and enclose it in a transparent bag. Keep the sphagnum moss moist and the bag closed to create a humid environment. In a few weeks, roots will begin to form on the branch. Once the roots are well-developed, you can sever the branch from the parent tree and pot it up on its own.

Air layering is a relatively simple and straightforward technique that can be used to propagate a wide variety of bonsai cultivars. With a little practice, you can master this technique and use it to expand your bonsai collection and create beautiful and unique bonsai trees.

Filling Empty Spaces

Air layering can be used to fill empty spaces in the canopy of a bonsai tree or to replace dead branches. By air layering a branch from another part of the same tree, you can create a new branch that is genetically identical to the rest of the tree. This ensures that the new branch will be compatible with the tree and will not disrupt its overall balance and harmony.

To fill an empty space in the canopy, choose a branch that is located near the desired location. Air layer the branch and train it to grow in the direction of the empty space. Once the new branch has grown into the desired position, you can remove the air layering and the new branch will be permanently attached to the tree.

To replace a dead branch, air layer a branch from another part of the tree and train it to grow in the same position as the dead branch. Once the new branch has grown into place, you can remove the dead branch and the new branch will take its place.

Air layering is a versatile technique that can be used to fill empty spaces and replace dead branches in bonsai trees. With a little practice, you can master this technique and use it to create beautiful and balanced bonsai trees.

Changing the Tree’s Shape

Air layering can be used to change the growth pattern and architecture of a bonsai tree by strategically placing air layers to alter the direction of new branches. This technique can be used to create a variety of different shapes and styles, including cascade, literati, and windswept bonsai trees.

To change the direction of a branch, air layer the branch and then train it to grow in the desired direction. You can use wire or other supports to help train the branch into the desired position. Once the branch has grown into the desired position, you can remove the air layering and the branch will be permanently attached to the tree in its new position.

Air layering can also be used to create new branches in specific locations on the tree. This can be useful for filling in empty spaces in the canopy or for creating a more balanced and visually appealing tree. To create a new branch, air layer a branch from another part of the tree and train it to grow in the desired location. Once the new branch has grown into place, you can remove the air layering and the new branch will be permanently attached to the tree.

Air layering is a versatile technique that can be used to change the shape and architecture of bonsai trees. With a little practice, you can master this technique and use it to create beautiful and unique bonsai trees.

Creating Unique Forms

Air layering can be used to create unique and artistic bonsai styles, such as twin-trunked or cascading forms. These styles are often difficult to achieve through other propagation methods, but air layering provides a way to create these unique forms with relative ease.

To create a twin-trunked bonsai, air layer two branches that are close together on the trunk of the tree. Once the roots have developed on both branches, you can sever the branches from the parent tree and plant them together in a single pot. The two trunks will eventually grow together and form a single, thick trunk.

To create a cascading bonsai, air layer a branch that is located near the top of the tree. Once the roots have developed on the branch, you can sever the branch from the parent tree and plant it in a pot that is placed on a stand or shelf. The branch will continue to grow and cascade down the side of the pot.

Air layering is a versatile technique that can be used to create a variety of unique and artistic bonsai styles. With a little practice, you can master this technique and use it to create beautiful and unique bonsai trees.

What are the advantages of air layering over other propagation methods?

Air layering has several advantages over other propagation methods, including:

  • Higher success rate: Air layering bypasses the challenges of traditional propagation methods, such as cuttings or grafting, which can be more difficult and less successful, especially with certain plant species.
  • Preservation of cultivar characteristics: Air layering ensures the genetic integrity of the new plant, as it is an exact clone of the parent plant, preserving desirable traits and characteristics.
  • Propagation of difficult-to-root plants: Some plant species or cultivars are notoriously difficult to propagate through conventional methods. Air layering provides an alternative approach to successfully propagate these plants by inducing root growth on branches that may not root easily otherwise.
  • Control over root placement: Air layering allows the grower to control the location of the new root system. This is particularly useful in bonsai cultivation, where specific root placement can influence the overall shape and aesthetics of the tree.
  • Non-destructive propagation: Unlike other propagation methods like cuttings or division, air layering does not require the removal of the propagated plant from the parent plant. This allows for continuous growth and development of both the parent plant and the air layered branch simultaneously.

What types of plants can be propagated using air layering?

Air layering is a versatile propagation technique that can be used on a wide range of plants, including:

  • Ficus
  • Schefflera
  • Hibiscus
  • Rhododendron
  • Azalea
  • Camellia
  • Juniper
  • Pine
  • Spruce
  • Fir

What is the best time of year to perform air layering?

The best time of year to perform air layering is during the growing season, when the plant is actively growing and producing new leaves and shoots. In most climates, this is during the spring or early summer.

How long does it take for roots to develop on an air layer?

The time it takes for roots to develop on an air layer can vary depending on the plant species, the environmental conditions, and the skill of the propagator. In general, it takes several weeks to several months for roots to develop.

How do I know when the air layer is ready to be removed from the parent plant?

You can check the roots on the air layer by gently squeezing the sphagnum moss around the air layer. If you feel any resistance, it means that roots have started to develop. Once the roots are at least 1 inch long and are white and healthy, you can remove the air layer from the parent plant.

Related Posts
Repotting Bonsai: A Comprehensive Guide to Nurture Healthy Growth

The Art of Bonsai Repotting: Nurturing Growth, Preserving Beauty Bonsai, the ancient art of cultivating miniature trees, requires meticulous care Read more

Fertilizing Bonsai: The Essential Guide to Keep Your Miniatures Thriving

The Art of Nourishing Miniature Masterpieces: A Comprehensive Guide to Bonsai Fertilization Fertilizing Bonsai: A Guide to Miniature Tree Maintenance Read more

7 Secret Tips for Growing a Thriving Bonsai Tree: Beginners Guide

Unveiling the Secrets: A Beginner's Journey into the Art of Bonsai Embark on the Enchanting Journey of Bonsai: A Beginner's Read more

Bonsai Watering 101: Everything You Need to Know

The Essential Guide to Bonsai Watering: Unlocking the Secrets of Miniature Tree Care Understanding the Art of Bonsai Watering: A Read more

A note to our visitors

This website has updated its privacy policy in compliance with changes to European Union data protection law, for all members globally. We’ve also updated our Privacy Policy to give you more information about your rights and responsibilities with respect to your privacy and personal information. Please read this to review the updates about which cookies we use and what information we collect on our site. By continuing to use this site, you are agreeing to our updated privacy policy.

Bonsai Trees and Supplies Direct From the Grower !
Automated SEO Heist